Tree
Ext JS 4.0 introduces a solid foundation for one of our most versatile components - Tree. Tree and grid now both extend from the same base class. All of the benefits of grid - features, extensions, and plugins can now be used on trees. Things like columns, column resizing, dragging and dropping, renderers, sorting and filtering can now be expected to work similarly for both components. Additionally, we are planning on implementing new features to do things like paging and buffered rendering for very large trees.
Lets start by creating a very simple Tree.
var tree = Ext.create('Ext.tree.Panel', {
    title: 'Simple Tree',
    root: {
        text: 'Root',
        expanded: true,
        children: [{
            text: 'Child 1',
            leaf: true
        }, {
            text: 'Child 2',
            leaf: true
        }]
    }
});
We have defined a root node for our tree and told it to be expanded. We also defined two children inline, both of which we said are leaf nodes. Setting the *leaf* config to true indicates that the node won't be able to contain child nodes. The text property, like the name suggests, is used as the node's text label. The tree that this code produces looks like the following.

The base class that Tree extends from, Ext.panel.Table, is responsible for several things.
- Setting up and managing a (data)view
- Binding to a store
- Creating a header container
- Creating a selection model
In the case of Ext.tree.Panel, the store has to be an instance of Ext.data.TreeStore, the view will be an instance of Ext.tree.View and the selection model by default is an instance of Ext.selection.TreeModel.
In order to make setting up a tree as easy as possible, we make some assumptions internally. Sometimes you want your tree to behave or look differently. Fortunately, there are many configurations at our disposal to do so. We will start with visual configurations, and then dive into the data structures behind our tree.
Visually changing your tree
Let's try something simple. When you set the *useArrows* configuration to true, we hide the lines and use arrows as expand and collapse icons.
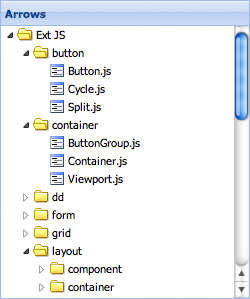
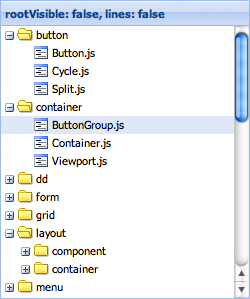
Sometimes you don't want the root node to be visible. Setting the *rootVisible property to false visually removes the root node. By doing this, your root node will automatically be expanded. The following image shows the same tree with **rootVisible* set to false. We have also set lines** false.
TODO: icon and iconCls
Multiple columns
Since our tree now extends a grid, adding more columns is very easy to do.
var tree = Ext.create('Ext.tree.Panel', {
    title: 'TreeGrid',
    fields: ['name', 'description'],
    columns: [{
        xtype: 'treecolumn',
        text: 'Name',
        dataIndex: 'name',
        width: 150,
        sortable: true
    }, {
        text: 'Description',
        dataIndex: 'description',
        flex: 1,
        sortable: true
    }],
    root: {
        name: 'Root',
        description: 'Root description',
        expanded: true,
        children: [{
            name: 'Child 1',
            description: 'Description 1',
            leaf: true
        }, {
            name: 'Child 2',
            description: 'Description 2',
            leaf: true
        }]
    }
});
We have defined the columns configuration. The available configurations are exactly the same as those available for grid columns. You can use any type of column you would use in a grid. The only requirement when using multiple columns in a Tree is that you must supply at least one column with an xtype of *treecolumn*. This column decorates the column's renderer to visualize things like depth, lines and the expand and collapse icons. You usually want to create only one column of this type in your tree.
We also specified the *fields configuration, which will be passed on to the internally created store. We will get into this in more detail later in the guide, but for now just notice how the **dataIndex*** configurations on the columns map to the fields we specified - name and description.
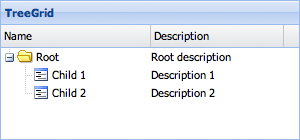
It is also worth noting that when you don't specify columns, the tree will automatically create one single *treecolumn for you with a **dataIndex* set to 'text'. It also hides the headers on the tree. If you want to show this header when using only a single column, you can set the hideHeaders** configuration to 'false'.
Events
Info about tree events here
Adding nodes to the tree
So far we haven't specified a store in any of our code. Since we haven't done so the tree will create a TreeStore for you and pass the root configuration to this store. This internally created TreeStore will get a memory proxy by default. This means that you can't load nodes from the server asynchronously. Instead you are expected to append all the nodes to your tree programmatically. We will look at how to do this in a little bit.
Note that when you create a tree this way, you don't necessarily have to specify a root node right away. The following will achieve the exact same result except now we dynamically set the root node after the tree has been created.
var tree = Ext.create('Ext.tree.Panel');
tree.setRootNode({
    text: 'Root',
    expanded: true,
    children: [{
        text: 'Child 1',
        leaf: true
    }, {
        text: 'Child 2',
        leaf: true
    }]
});
Although this is useful for very small trees with only a few static nodes, usually your tree will contain many more nodes. So let's take a look at how we can programmatically add new nodes to the tree.
var root = tree.getRootNode();

var parent = root.appendChild({
    text: 'Parent 1'
});

parent.appendChild({
    text: 'Child 3',
    leaf: true
});

parent.expand();
When adding new nodes to the tree, you always need to get a reference to the parent you want to append the new node to. In this case we got a reference to the root node. You can call appendChild on any node in the tree that is not a leaf. It accepts a node instance or an object containing data that will be used to create a new node. The method always returns a fully instantiated node. In this example we programmatically call the expand method to expand our newly created parent.
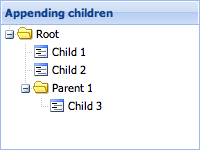
We could have also just set the *expanded* configuration when defining the parent. Also useful is the ability to define children inline when creating the new parent nodes. The following code gives us the same result.
var parent = root.appendChild({
    text: 'Parent 1',
    expanded: true,
    children: [{
        text: 'Child 3',
        leaf: true
    }]
});
Sometimes you will want to insert a node into a specific location in the tree instead of appending it. Besides the appendChild method, we also provide insertBefore and insertChild methods.
var child = parent.insertChild(0, {
    text: 'Child 2.5',
    leaf: true
});

parent.insertBefore({
    text: 'Child 2.75',
    leaf: true
}, child.nextSibling);
As you can see the insertChild method expects an index at which the child will be inserted. The insertBefore method expects a reference node. Your new node will be inserted before that node.
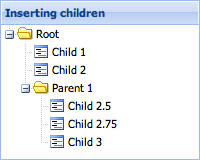
One other thing to note is the *nextSibling* property we used. There are several more properties on nodes that we can use to reference other nodes.
- nextSibling
- previousSibling
- parentNode
- lastChild
- firstChild
- childNodes
The Node Interface
So far we have come across several methods and properties on nodes. But what are nodes exactly? As we have mentioned before, the tree Panel is bound to a TreeStore. A store in Ext JS manages a collection of model instances. We created a NodeInterface that can be used to decorate any model with fields, methods and properties required to have to model be used in a tree. When we refer to a node, we essentially are referring to a model instance that is decorated with the NodeInterface. The following screenshot shows you by logging a node in the developer tools.
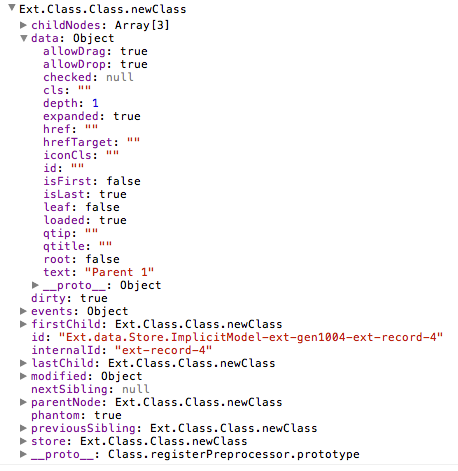
In order to see the full set of fields, methods and properties available on nodes, you can check out the API documentation for the NodeInterface class.
- list these fields and explain briefly what each one does
The tree's Store
- introduction to specifying your own store
- define your own model with a proxy to asynchronously retrieve nodes from the server
- show the same model instances in tree and grid at the same time
Editing, Drag & Drop, Sorting and Filtering
Stay tuned!